Hollowing your NURBS model for the Powder Printer
Objects made on the powder printer can be more expensive than those made on our Ultimaker or TAZ printers. The best way to decrease the cost of printing on the powder printer is to hollow out your model such that it doesn’t consume more materials than it needs to.
This has to be done carefully though because if your object’s walls are too thin, they are likely to break during part removal. The hollowing process must also provide some kind of escape for material that would otherwise be contained inside a model. Not allowing uncured material to escape will dramatically increase your part’s weight without increasing its strength at all and will almost certainly lead to a broken part. Also, any volume of material that cannot be recovered from the finished print will be charged for after the object is printed, but may not show up on the object’s print estimate.
The following tutorial will show you the best ways to hollow NURBS.
Hollowing NURBS surface volumes
When modeling in Rhino with NURBS surfaces (i.e. polysurfaces or extrusions), you can use the Shell command to quickly attempt to turn a closed polysurface into a hollowed out version of itself with open faces. To increase the accuracy of the calculated surfaces inset from your object’s outer surface you should first scale your object to its final size at scale for printing. When your object is resized to fit within the printer’s bounds, reset your absolute tolerance with the Units command.
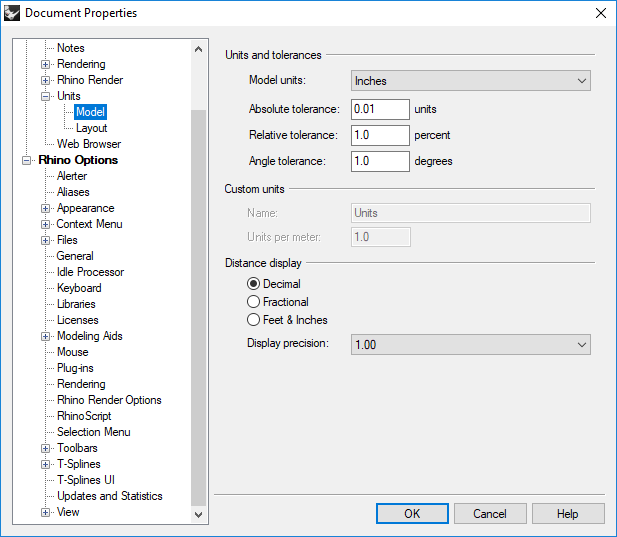
Your model units, if printing to the powder printer, can be set to Inches, Millimeters, Centimeters, or Meters. Then, set your Absolute tolerance to something between 0.05 and 0.001 units. Keep in mind, that the smaller your tolerance, the longer all Rhino functions will take to perform, and the more error prone the results will be. This is best for smooth, curvilinear surfaces with small details. A larger absolute tolerance will lead to less accurate results and faster processing. It tends to work better with sharp edged objects. If you have an object with both sharp and round edges, try multiple modeling tolerances to see what works best for you.
The Shell command works by selecting a closed polysurface and then choosing a face of that polysurface that will be replaced by a hole to the interior volume created. A specified thickness (that should never be smaller than 2mm, but may need to be larger to support heavier objects) will be used to determine how far to inset the new surface from the original object.
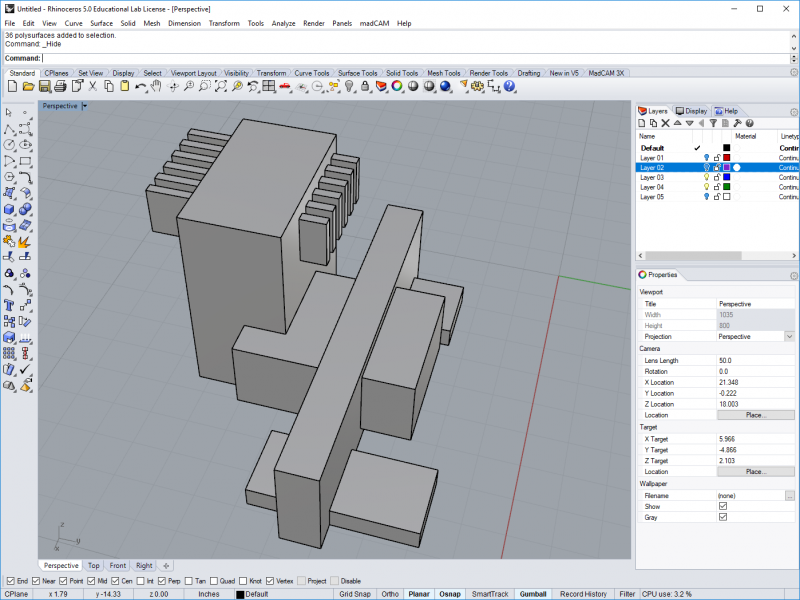
Take the below example:
Selecting that object for the Shell command, then selecting the bottom surface of the large volume on rear left of the object, creates the following result with a 2mm thick wall around the entire interior.

This would be suitable for powder printing, but there is still likely to be a lot of powder held in the right side of the object, even though there is technically a way for the powder to escape. To ensure that unused powder will be able to escape your object so that you aren’t charged for it and so that your object doesn’t break under the weight of the uncured powder, you can select multiple faces, even adjoinging ones, and they’ll be turned into holes into the interior volume as well. The result below will print with much better results:

If a portion of an object is too small to acommodate an interior volume for the thickness of shell selected, such as in the case of the narrow protrusion on the left side of the example piece, some unjoined geometry may be generated, but no hole will be made that would be smaller than the specified thickness.

Aside from the Shell command, you can also use the OffsetSrf command to create an inset polysurface if you have an object that doesn’t have a readily removable face for a hole.
Take the below example:
The result of this will need to have a hole added to it manually. Here, you can add a hole by creating another piece of geometry, for example a cylinder, and placing it through both sets of polysurfaces. Be sure that the surface completely intersects both polysurfaces. A partial or contact intersection can lead to complicated or problematic results. Note that powder escape holes should not be smaller than 10mm or 3/8” across.

Split the polysurfaces against each other, then delete the unneeded geometry. The Boolean operations are unsuitable for this specific situation because their interior volumes would subsume each other.

Again, while this model would still print, it would be difficult to remove the powder from and either a larger hole, or several other holes, should be placed on the object.

If your model is no longer printable after attempting hollowing with this method, you may have more luck hollowing your model as a mesh. See our tutorials for hollowing a mesh in Rhino and in Meshmixer for more information.